Migrating AEM to WordPress (the frontend, content, and backend)
We’ll start by migrating the frontend.
Migrating the frontend: Getting started with theme development
When migrating your AEM frontend to WordPress, you start by working your theme. You’d recall how we decided to use a starter theme locally for this purpose during pre-migration stage. You’ll build upon this basic theme basically.

Base theme creation
WordPress themes are typically PHP-based and represent the visual layer of your site. To match your AEM site’s existing design, start by creating a custom theme in WordPress. A typical theme structure includes:
- style.css – Defines the core styling for your theme.
- index.php – Serves as the fallback template for displaying content.
This allows you to create a templating environment similar to AEM, offering a cleaner separation of logic and markup, making it easier to maintain and extend.
Templates
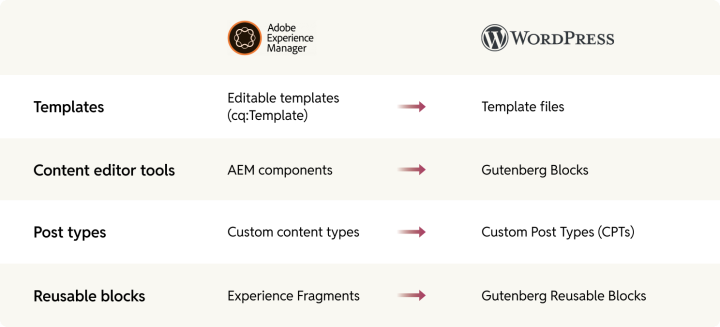
AEM uses editable templates (cq:Template) to define page structures, whereas WordPress uses template files to control how different types of content are displayed. For example, you can create:
- single.php – Used to display individual blog posts.
- page-{slug}.php – Custom templates for specific pages, allowing unique layouts per page type.
WordPress offers extensive flexibility with template files, enabling you to match the structure and presentation logic of AEM templates in a way that is easily manageable.
Content editor tools
Gutenberg blocks vs. AEM components
AEM components, like Hero Banners or Callout Blocks, can be converted into Gutenberg Blocks in WordPress. This conversion allows editors to build pages visually similarly, maintaining familiarity.
The Gutenberg Block Editor in WordPress uses JavaScript and React, which allows for the creation of custom blocks that mirror AEM components’ functionality.
Custom post types
AEM often features custom content types, such as “Location” or “Service”. These should be replicated as Custom Post Types (CPTs) in WordPress. This ensures that specific content types remain distinct from standard Pages and Posts, providing better organization and customizability.
To create a CPT in WordPress, use the register_post_type() function.
For instance
			function create_custom_post_types() {
    register_post_type('location', [
        'label' => 'Location',
        'public' => true,
        'supports' => ['title', 'editor', 'custom-fields'],
        'menu_icon' => 'dashicons-location-alt',
    ]);
}
add_action('init', 'create_custom_post_types');
This code snippet creates a new post type called Location, which can have its own set of fields, taxonomies, and templates, similar to AEM’s custom content types.
Gutenberg reusable blocks (for AEM Experience Fragments)
Experience Fragments in AEM allow content reuse across pages and channels. To replicate this in WordPress, you can use Gutenberg Reusable Blocks.
Converting Experience FragmentsExperience Fragments can be exported as HTML and JSON and we can use the WordPress REST API to automate the creation of these reusable blocks.
			wp.apiFetch({
    path: '/wp/v2/blocks',
    method: 'POST',
    data: {
        title: 'Reusable Block Title',
        content: 'HTML Content Here</p>',
        type: 'wp_block',
  },});
This allows you to recreate the reusable content elements that editors can use across different pages, maintaining the flexibility and consistency offered by AEM’s Experience Fragments.
While you’ve begun working on the frontend migration, you can start working on content migration in parallel.
Migrating content (the actual content and media)
There are three parts to migrating your AEM content to WordPress. First, there’s your actual content (posts and pages). Then you’ve your media files. And the final aspect of migrating content from AEM to WordPress is mapping AEM URLs for the different content and media assets. Let’s look at each in detail.

Moving pages and posts
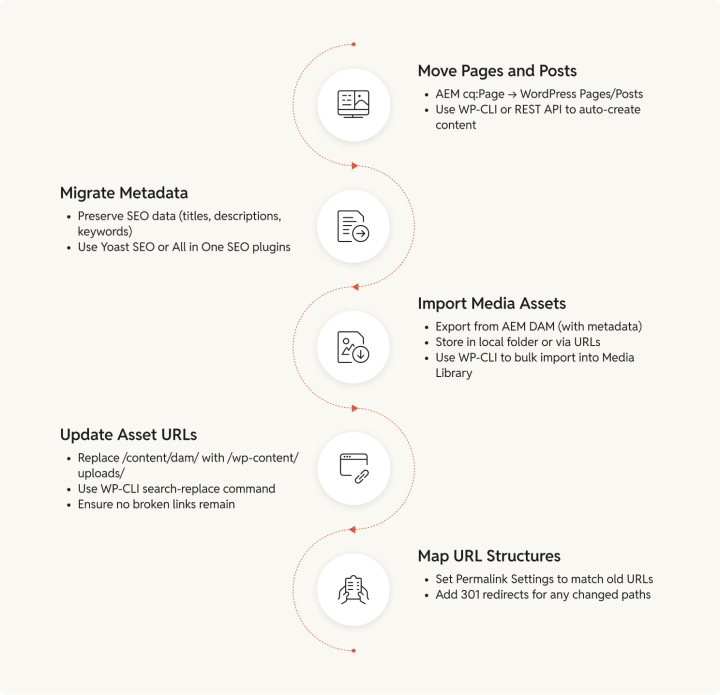
In AEM, pages are represented using the cq:Page type, while in WordPress, we categorize content into Pages and Posts. The goal is to map each AEM page to its WordPress equivalent accurately. The mapping process must ensure consistency in the structure and presentation of your content to provide a seamless user experience.
To programmatically create these pages and posts in WordPress, we can utilize the WordPress REST API or WP-CLI commands.
For example:
			wp post create --post_type=page --post_title="Home"
 --post_content="Content goes here" --post_status="publish"
This will allow for efficient migration without manual recreation of each page or post, which is particularly useful when dealing with large-scale sites.
Migrating metadata
When migrating content, also use an SEO plugin, such as Yoast SEO or All in One SEO, to set up title tags, meta descriptions, and focus keywords for each post or page, ensuring that these match what was implemented in AEM. This will help maintain search engine rankings during the transition.
Migrating digital assets from AEM DAM
AEM’s Digital Asset Management (DAM) system manages an AEM instance’s images, videos, documents, and other media assets. Migrating these assets to WordPress involves several key steps:
Asset export from DAM
Use the AEM Content Transfer Tool or export directly from the AEM interface in bulk. It’s important to export with all metadata attached, as this helps retain asset context during the migration.
For assets in AEM DAM, leverage /content/dam URLs with .model.json extensions to extract metadata in a structured JSON format.
Import into the WordPress media library
After exporting assets from AEM’s Digital Asset Management (DAM), the next step is to import them into the WordPress Media Library. This process ensures that all your images, videos, and other media are available for use in your WordPress environment. Here’s how you can manage this efficiently, especially when dealing with a large volume of assets.
Prepare assets for import
Before importing, ensure that:
- All assets exported from AEM are stored in a local directory or accessible through a URL.
- Metadata from AEM (e.g., titles, descriptions, alt text) is structured in a compatible format, such as JSON or CSV, so it can be mapped to WordPress fields.
- Files are named and organized consistently to make the import process smooth.
(You may have actually already taken care of these in the data cleanup step we saw in pre-migration stage.)
Using WP-CLI for bulk import
For large-scale imports, the WordPress Command Line Interface (WP-CLI) is a powerful tool. The wp media import command can be used to upload assets directly into the Media Library.
Here’s an example command:
wp media import /path/to/your/assets/* --preserve-filetime
Handling asset URLs and renditions
Migrating assets from AEM to WordPress involves two key aspects: ensuring the URLs are updated correctly and replicating AEM’s image renditions. Proper handling of these elements ensures that your media assets remain accessible and display appropriately across your new site.
Updating asset URLs
AEM stores assets using paths like /content/dam/, which won’t align with WordPress’s structure, typically /wp-content/uploads/. To prevent broken links, you’ll need to replace old URLs in the WordPress database. This can be automated using WP-CLI:
wp search-replace 'https://aem-site.com/content/dam/' 'https://wordpress-site.com/wp-content/uploads/' --skip-columns=guid
After the replacement, test your site thoroughly to ensure all images and media files load correctly. Tools like browser developer consoles can help identify any lingering broken links.
Managing image renditions
AEM allows multiple renditions of assets (e.g., thumbnails, high-resolution images, etc.) for different use cases. WordPress also offers a responsive image system that automatically creates multiple sizes (e.g., thumbnail, medium, large) for each upload. If your AEM workflow relied on unique renditions, you can define custom sizes in WordPress by adding this to your theme’s
functions.php:
add_image_size('custom-size', 800, 600, true);
For existing uploads, tools like Regenerate Thumbnails can generate missing sizes to match your custom definitions.
Mapping URL structures to support the content import
AEM and WordPress URL structures can differ significantly, which can impact your SEO if not managed carefully. In WordPress, ensure that Permalink Settings are configured to reflect your previous AEM URL structure. This will help maintain consistency in URLs, which is crucial for both search engines and user experience.
To replicate AEM’s URL structure in WordPress:
Configure WordPress’s permalink settings
In WordPress, configure Permalink Settings to reflect the original AEM URLs wherever possible. This helps ensure that users and search engines continue to recognize and navigate the site as they did before.
301 redirects
Implement 301 redirects using a redirection plugin or server-level configurations to point any changed URLs to the new correct paths. This helps avoid broken links and retains SEO authority from old URLs.
(We’ve already discussed handling media links when migrating media files in the above section.)
Migrating the backend (functionalities, features, integrations, and more)
Migrating the backend is about ensuring every feature, functionality, and integration works seamlessly in the new environment. From custom workflows to third-party solutions, a successful backend migration preserves business continuity. Here’s how to approach backend migration. Let’s start with APIs.
Replicating custom API interactions
If your AEM setup interacts with custom APIs, it’s important to bring that capability over to WordPress. To do so you can use the WP_HTTP API.
WP_HTTP API
Use the WP_HTTP API to handle API requests. It allows you to seamlessly make GET, POST, and other requests to fetch or send data. This will help in replicating the data fetch functionality from AEM to WordPress.
For instance, if you need to pull data from an external service and display it, you can use a shortcode like:
			function fetch_external_data_shortcode() {
    $response = wp_remote_get('https://api.example.com/data');
    if (is_wp_error($response)) {
        return 'Error fetching data';
    }
    $data = wp_remote_retrieve_body($response);
    return '' . esc_html($data) . '</div>';
}
add_shortcode('external_data', 'fetch_external_data_shortcode');
WordPress also supports Custom REST API Endpoints, which can be used to create your own API routes for interacting with your data programmatically. This can be especially powerful when combined with caching techniques like using the transient API to store API responses, reducing load and improving performance.
Bringing over multisite setup and permissions
If your AEM setup includes multiple sites (like regional variations or campaign-specific microsites), WordPress’s Multisite functionality will allow you to replicate that structure:
To enable multisite in WordPress, start by modifying your wp-config.php
define ('WP_ALLOW_MULTISITE', true);
This will allow you to create a multisite network using subdomains (e.g., region1.example.com) or subdirectories (e.g., example.com/region1). This setup allows for efficient content management, similar to AEM’s multi-instance capabilities while centralizing administration and resources.
Replicating AEM’s user roles and permissions management on WordPress
AEM’s user groups and permissions allow for detailed control over content management. In contrast, WordPress provides default roles like Administrator, Editor, Author, Contributor, and Subscriber, but you can extend these roles to match AEM’s permissions:
Using plugins like the User Role Editor plugin
Use the User Role Editor plugin to customize roles and permissions within WordPress. You can replicate complex AEM permission setups by creating roles such as “Regional Editor” or “Campaign Manager” that mirror the capabilities of AEM user groups.
Custom coding
You can also define custom capabilities for specific tasks like managing assets or editing only certain content types. This ensures content management is as secure and structured as it was in AEM, with editors restricted or empowered based on their roles.
Recreating AEM-like personalizations on WordPress
WordPress by itself allows you to present personalized content to users using default features, such as managing logged-in vs. logged-out content visibility. You can leverage built-in user roles and the ability to create pages and posts restricted to specific users or groups.
User tracking for custom personalization
To create a more tailored experience, user tracking and meta-data management can be implemented. For example, WordPress hooks like wp_login can track logged-in user behavior and then use this information to modify the user experience:
Example:Assume you want to show returning users a different homepage. Use wp_login to update user meta information and set a cookie. This can be read by a custom PHP function to show specific content based on whether the user is a first-time visitor or returning.
			add_action('wp_login', 'track_user_login', 10, 2);
function track_user_login($user_login, $user) {
    update_user_meta($user->ID, 'last_login_time', current_time('mysql'));
}

function display_personalized_message() {
    if (is_user_logged_in() && get_user_meta(get_current_user_id(), 'last_login_time', true)) {
        echo 'Welcome back! Here are some updates since your last visit.</p>';
    } else {
        echo 'Welcome! Let’s explore the latest content.</p>';
    }
}
add_action('wp_footer', 'display_personalized_message');
Migrating AEM’s editorial management capabilities to WordPress
AEM workflows ensure that content goes through review and approval processes before it gets published. By default, WordPress includes basic publishing workflows where you have roles such as Author, Contributor, Editor, and Administrator. Authors and contributors can create content that needs to be approved by editors before publishing, which offers some built-in control over content flow.

Extending WordPress’s default ediotirla features
For more advanced workflows akin to what AEM provided, you can tap some WordPress plugins.
Using plugins like PublishPress or Edit Flow
To add custom editorial workflows and statuses, PublishPress or Edit Flow can be used. These plugins enable you to create custom content statuses beyond the default “Draft” and “Published”. You could add statuses such as “Needs Review,” “Awaiting Legal Approval,” or “Ready to Publish.” This replicates the multi-stage review and approval process of AEM, allowing for greater content quality control.
Using plugins for notifications and task assignments
With these plugins, notifications can be automatically sent to relevant users, such as editors and approvers, whenever content moves to a new stage. This automated communication helps streamline the editorial process, similar to AEM’s workflow tools.
Migrating AEM Forms to WordPress
In AEM, forms are used for capturing user data, often with complex workflows and conditions. WordPress has a default commenting and contact functionality, but it lacks built-in support for creating complex forms with logic, field validation, or integrations with external services. Only develop custom forms if you need very specific features.

Using form plugins like Gravity Forms
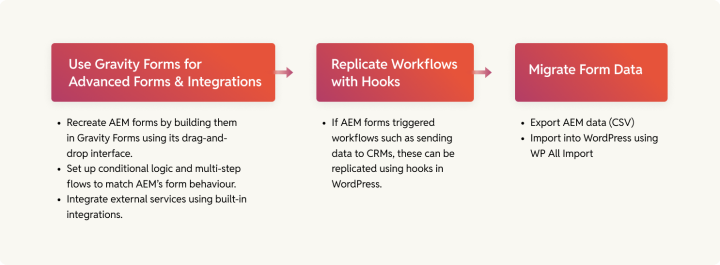
You can use Gravity Forms to replicate AEM’s advanced form functionality. Gravity Forms offers drag-and-drop form creation, conditional logic, and support for multi-step forms, similar to what AEM Forms provides. This makes the migration of AEM forms into WordPress much more straightforward for businesses and reduces development time.
We could even call Gravity Forms a complete WordPress alternative to AEM Forms! Gravity Forms provides many pre-built fields and options, which simplifies the recreation of existing AEM forms. It even integrates easily with external services, such as CRMs or email marketing tools, ensuring that the workflows from AEM remain intact.
Custom workflows for form handling
If AEM forms triggered workflows such as sending data to CRMs, these can be replicated using hooks in WordPress. Here’s an example using Gravity Forms:
			add_action('gform_after_submission', 'send_data_to_crm', 10, 2);
function send_data_to_crm($entry, $form) {
    $data = [
        'name' => rgar($entry, '1'),
        'email' => rgar($entry, '2'),
    ];
    // Use CURL or any HTTP client to send data to CRM.
}
Form data migration
To migrate your form data, export data from AEM as a CSV file and then import it into WordPress using a tool like WP All Import. This ensures historical form data is preserved without manual effort.
Migrating analytics from AEM to WordPress
AEM integrates closely with Adobe Analytics for tracking. To replicate similar analytics functionality in WordPress, you can use the ubiquitous Google Analytics.
Google Analytics integration
You can implement Google Analytics by adding its tracking script to your theme or integrating it with a Tag Management solution such as Google Tag Manager. This helps to monitor user activity, understand behavior, and gather important insights just as effectively as Adobe Analytics.
Historical data migration
If you want to maintain historical tracking data, export it from Adobe Analytics in CSV or JSON format for archival purposes or import it into a data visualization tool for ongoing analysis.
Recreating AEM’s marketing automation on WordPress
In AEM, you might have used features like Adobe Campaign for marketing automation. WordPress can achieve similar automation through integrations with third party solutions:
For example, you can connect MailChimp or another email marketing platform with your forms to automate email marketing campaigns. This allows you to continue nurturing your leads and creating campaigns automatically.
For more specific requirements, custom scripts can be developed to integrate with email marketing systems using their available APIs, ensuring that all marketing campaigns remain automated.
Migrating AEM tags and taxonomies to WordPress
WordPress has built-in support for categories and tags as well as the ability to create custom taxonomies. To migrate AEM taxonomies to WordPress, extract tags and taxonomies from AEM in JSON format and import them into WordPress using WP-CLI commands or custom scripts to ensure a consistent classification structure
wp term create category "New Category Name"
wp term create post_tag "Tag from AEM" --description="Imported tag description"
This helps preserve the organization of your content and maintains searchability.
WP All Import. This ensures historical form data is preserved without manual effort.
Recreating AEM’s caching and performance optimization features on WordPress
WordPress offers basic caching functionality that can be extended using server-level or object caching tools.
Object and page caching
You can set up caching using tools like Redis or Memcached for object-level caching to improve database query response times. Use server-level caching to store rendered pages for quicker delivery.
CDN integration for better performance
Implement a Content Delivery Network (CDN) such as Cloudflare to replicate the global content caching and delivery that AEM uses. This ensures your WordPress site is optimized for users regardless of their geographic location.
Rebuilding AEM’s search functionality on WordPress
To offer a quality search experience on WordPress, you can consider integrating a search solution like Elasticsearch into your WordPress environment. Elasticsearch provides similar speed and relevance in search results, ensuring users can quickly find the content they’re interested in.


