Handling your Kentico Content and SEO Migration to WordPress

While we have done a content audit in the discovery phase, it’s important to again realign the content migration strategy by doing an audit.
Re-audit your content for updates
Before finalizing your website migration, it’s crucial to conduct a thorough content re-audit. During the migration period, new content may have been added to your Kentico site, or existing content may have become outdated or irrelevant.
Implement a content freeze
Introducing new content during the migration can complicate the process, so it’s important to implement a content freeze beforehand.
Set a content freeze period at least a week before the migration begins, and notify all teams. Clear the content pipeline to avoid any disruptions during the transition
Reinspect your SEO
Re-audit your SEO at this stage, it will help you update the gap for any SEO updates made during the migration. This process will enhance your site’s performance and allow you to plan for necessary redirects.
Use tools like Google Analytics and Google Search Console to gather data on your site’s current performance.
- Key metrics to record include:
- Changes in organic traffic and engagement rates.
- Updated keyword rankings.
Re-assess high-value URLs:
- Make a list of URLs that are currently ranking for important keywords or driving significant traffic.
- Prioritize these URLs for migration and ensure that they are redirected properly after the migration, if needed. For example, let’s say: If the URL /service/discovery-consulting/ is ranking for several targeted keywords, it should be our priority to redirect it to the corresponding new WordPress page.
If you’re keeping the same URL structure in WordPress, redirections may not be necessary. However, if you’re altering URLs (such as adopting a more user-friendly permalink structure), make sure to set up redirects to prevent broken links and maintain SEO value. WordPress provides simple tools to handle URL redirects effectively.
Planning for redirects
- Develop a detailed plan for implementing 301 redirects to map Kentico URLs to their new WordPress counterparts.
- As mentioned above, in audits use a spreadsheet to document the old URLs and their corresponding new URLs.
Example:
| Old URL | New URL |
| /blogs/old-blog-post | /blogs/old-blog-post/ |
| /services/web-development | /services/website-development/ |
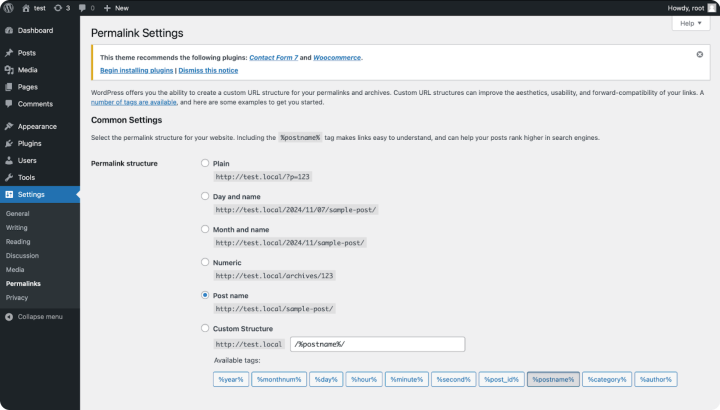
Sharing an example image below on how WordPress treats URLs:

Implement Redirects Using Plugins:
Use WordPress plugins like Redirection or Yoast SEO to manage the redirect process easily.
Test the redirects to ensure they work correctly, and that users are directed to the appropriate content.
Transfer SEO metadata
Import all relevant SEO metadata from Kentico, including:
- Meta titles
- Meta descriptions
- Alt text for images
- Canonical tags
- OG tags and others
You can use an SEO plugin like Yoast SEO or All in One SEO, These plugins will automatically create XML sitemaps and manage SEO metadata. Ensure that they’re installed and activated in WordPress.
For manual migration, you can deploy database queries to extract this data from Kentico and import it into the corresponding fields in WordPress.
Update interlinks and backlinks:
Use search-and-replace tools or implement a framework to update any hard-coded URLs in your database that reference the old site address.
Monitor backlinks: Utilize tools such as Google Search Console, Ahrefs, or SEMrush to track backlinks and identify any broken links that may arise from the migration.
Check external links: Verify that all outgoing links from your site lead to active and relevant pages. Replace or remove any broken links to maintain and enhance the user experience.
Updating your website’s address
After validating the successful transfer of your content, the final step is to update your website’s DNS settings to direct visitors to the new WordPress site instead of the old Kentico site. Here’s a concise guide:
- Log in to Your domain registrar’s account: Use the account where your domain is registered.
- Locate the DNS settings: Navigate to the section for managing DNS records.
- Modify the DNS records: Update the relevant DNS records (such as A records or CNAME records) to point to your new WordPress website’s IP address.
- Follow instructions: Most domain registrars provide detailed instructions and support for making these changes.
By updating your DNS settings, you will ensure a seamless transition for your visitors to the new WordPress site.
Note: Depending on your hosting provider, the changes in DNS settings can take up to 48 hours to update across the web.
Notify search engines
Update your sitemap and inform search engines about the change through Google Search Console by submitting the new sitemap.
Since WordPress version 5.5, a basic XML sitemap is automatically generated. You can access it by adding /wp-sitemap.xml at the end of your domain
(e.g., https://www.yourdomain.com/wp-sitemap.xml).
- You can enhance your sitemaps with an SEO plugin for better control:
- Yoast SEO Setup
- Install and activate Yoast SEO.
- Navigate to SEO > General > Features to manage sitemaps.
- All-in-One SEO Setup
- Install and activate All-in-One SEO.
- Go to All in One SEO > Sitemaps for an automatically generated sitemap.
- Yoast SEO Setup
Both options provide an easy way to optimize your site!
- To submit your sitemap:
- Log in to Google Search Console.
- Navigate to “Sitemaps” from the left-hand menu.
- Enter the last part of your sitemap URL (e.g., wp-sitemap.xml) and click “Submit.”
Note: The search console shall take some time to validate your XML sitemap.


