


Umbraco to WordPress: Pre-migration
The pre-migration phase is where a successful transition begins. It’s about more than just checklists, it’s the foundation for a stable, accurate, and disruption-free migration from Umbraco to WordPress.
This stage is focused on three key areas: technical setup, content preparation, and SEO continuity. Getting these right ensures your migration process runs smoothly and reduces the likelihood of data loss, misalignment, or performance issues.
Set up the right technical environment
A reliable technical setup is what enables realistic testing and smooth execution, without disrupting your live Umbraco website.
Development environment
Start by creating a dedicated development environment that mirrors your eventual production setup. This isolated environment allows your team to build and test themes, plugins, content structure, and integrations without interfering with ongoing site operations.
To ensure consistency across teams and machines:
- Use Docker for environment reproducibility
- Set up Git-based version control with branching strategies
- Implement CI/CD pipelines for automated testing and deployment
- Use local tools like LocalWP, DevKinsta, or Laravel Valet for simple and collaborative development
This environment becomes your sandbox for validating every piece before go-live.
Backup procedures
No migration should proceed without a full backup of your existing Umbraco instance. This should include:
- Your database, containing all content, metadata, and structure
- All media files, including images, videos, and downloads
- Custom code, such as Razor views, templates, or extensions
While Umbraco supports automated backups, also take manual backups using FTP and SQL exports for redundancy. Store backups securely on cloud storage or external drives to ensure fast restoration in case of rollback.
Testing framework
As development progresses, set up a comprehensive testing framework that covers:
- Functional testing: Confirm forms, navigation, search, and interactive elements are working as expected
- Design testing: Compare the new WordPress frontend with your existing Umbraco design for visual consistency
- Performance testing: Use tools like Google PageSpeed Insights, Lighthouse, or GTmetrix to benchmark site speed and responsiveness
- Content validation: Check that all migrated pages, posts, metadata, and media are complete and correctly displayed
Content preparation
Maintain your content’s integrity and structure throughout the migration.
Content mapping
Based on a detailed audit of the Umbraco content tree, create a mapping sheet to align it with WordPress structure:
- Umbraco Content Nodes: Map to WordPress posts, pages, or custom post types.
- Custom Fields in Umbraco: Transfer to Advanced Custom Fields (SCF) in WordPress.
- Parent-Child Relationships: Maintain hierarchies for menus, categories, and subpages.
Below is a table mapping common elements from Umbraco to WordPress:
| Content Type | Umbraco | WordPress | Notes |
|---|---|---|---|
| Pages | Content nodes with custom fields. | WordPress Pages with custom fields. | Ensure custom fields are mapped correctly. |
| Posts | Blog posts managed through Umbraco. | WordPress Posts managed through the dashboard. | Ensure blog posts are migrated with metadata. |
| Media | Images, videos, and documents managed through Umbraco. | Media managed through WordPress Media Library. | Ensure media URLs are updated correctly. |
| Custom post types | Custom document types in Umbraco. | Custom post types in WordPress. | Need to recreate custom post types in WordPress. |
| Taxonomies | Categories and tags managed through Umbraco. | Categories and tags managed through WordPress. | Ensure taxonomies are mapped correctly. |
Different sites require different methods, and the choice depends on factors such as site size, customizations, and timelines. Common strategies include:
- Automated migration: Ideal for bulk data transfers, such as blogs or media releases.
- Manual migration: Suitable for websites or where content structure and design require significant changes.
- Hybrid migration: Combines automation for repetitive tasks with manual migration for complex pages.
We typically use a hybrid migration approach, combining scripts and tools for structure, with manual QA for accuracy.
Export content from Umbraco
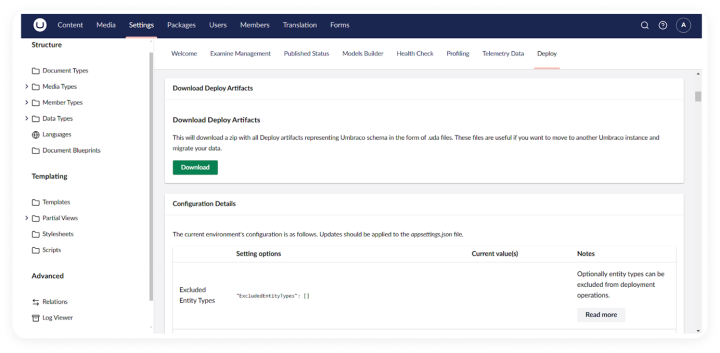
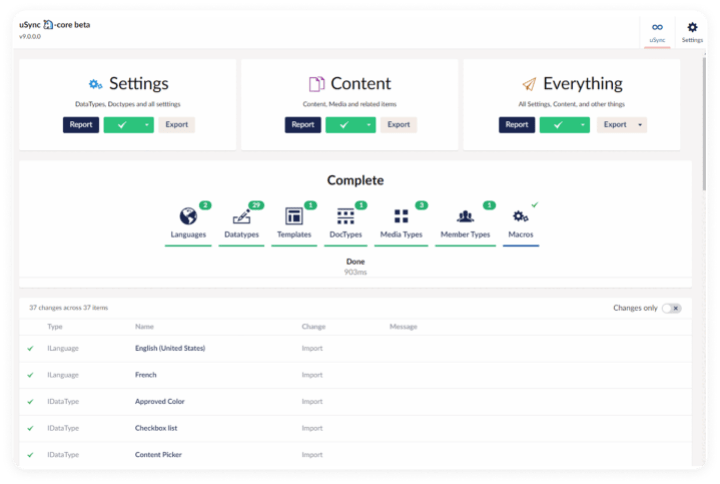
Export content using Umbraco’s built-in features (e.g., Umbraco Deploy or uSync) or third-party tools like SQL Server Management Studio, to ensure all the tables are captured.
- Consider using the Aspose .NET Database Data Exporter module for Umbraco, which allows exporting data directly from your database into various formats, including Excel and CSV. This module requires installation and configuration but provides a straightforward interface for exporting data.
- Scrape the website content from the frontend, which may be needed in case of legacy CMS versions like Umbraco 7.
- Export formats may include XML, CSV, or JSON, ensuring compatibility with WordPress import tools.
Here’s a simplified example of what an exported Umbraco page (document type “BlogPost”) might look like in XML format:
<node id="1234" parentID="5678" nodeTypeAlias="BlogPost" level="2" path="-1,5678,1234" sortOrder="1" uniqueID="guid:456789ab-cdef-1234-abcd-ef1234567890">
  <name>My First Blog Post</name>
  <properties>
    <pageTitle>My First Blog Post</pageTitle>
    <bodyText><![CDATA[<p>This is the body text of my first blog post.</p>]]></bodyText>
    <publishDate>2023-11-22T12:34:56Z</publishDate>
    <author>John Doe</author>
    <categories>Technology, Programming</categories>
  </properties>
</node>
Explanation of the XML Structure:
- Node: The root element representing a single node in Umbraco.
- Attributes:
id: Unique identifier of the node.parentID: ID of the parent node.nodeTypeAlias: Alias of the document type.level: Level of the node in the content tree.path: Path to the node, including parent IDs.sortOrder: Order of the node among its siblings.uniqueID: Unique identifier of the node.
- Name: The name of the node.
- Properties: A container for the node’s properties.
- Property: Each property is represented by its name and value.
- CDATA: Used to escape HTML content within the
bodyTextproperty to prevent XML parsing issues.
Import to WordPress
Import content using WordPress import tools:
- Use native WordPress import options, including REST API.
- Convert and import the database into WordPress using tools like WP All Import or custom scripts.
- Maintain content hierarchies (e.g., parent-child relationships) during import.
An example of a script to convert Umbraco nodes to WordPress posts and properties to custom fields or taxonomies:
			async function mapUmbracoXMLToWordPress(xmlData) {
  // Parse the XML data
  const parser = new DOMParser();
  const xmlDoc = parser.parseFromString(xmlData, "text/xml");

  // Replace with your WordPress REST API URL and authentication details
  const WP_API_URL = "https://your-wordpress-site.com/wp-json/wp/v2/";
  const WP_USERNAME = "your_username";
  const WP_PASSWORD = "your_password";

  // Function to fetch WordPress categories
  async function fetchWordPressCategories(categoryNames) {
    // ... same as in the previous script
  }

  // Iterate through Umbraco nodes
  const nodes = xmlDoc.getElementsByTagName("node");
  for (const node of nodes) {
    const wpPostData = {
      title: node.getElementsByTagName("name")[0].textContent,
      content: node.getElementsByTagName("bodyText")[0].textContent,
      status: 'publish', // Adjust status as needed
      categories: [],
    };

    // Map categories
    const categoryNames = node.getElementsByTagName("categories")[0].textContent.split(',');
    const wpCategories = await fetchWordPressCategories(categoryNames);
    wpPostData.categories = wpCategories.map(category => category.id);

    // Map other properties as needed (custom fields, etc.)

    // Send the post data to WordPress REST API
    // ... same as in the previous script
  }
}

// Assuming you have Umbraco XML data
const xmlData = `

`;

mapUmbracoXMLToWordPress(xmlData);
Data cleanup
Before migrating, it’s important to evaluate your existing content with a critical eye. Start by identifying outdated, redundant, or irrelevant content that no longer serves your audience or business goals. Removing this early helps reduce clutter and keeps your new WordPress instance lean and purposeful.
Next, review the formatting of the remaining content. Ensure consistency in heading levels, spacing, and internal linking so everything aligns with modern web standards and works well within WordPress’s block-based editing environment.
It’s also useful to tag high-performing or strategically important content, like landing pages, cornerstone blog posts, or SEO-critical articles, for early migration and thorough validation post-launch. These pieces often anchor traffic and should be prioritized accordingly.
Asset organization
Migrating media assets requires more than just bulk copying files over. Begin with a full audit of your Umbraco media library to sort assets by type, usage, and importance. This ensures a smooth handoff to WordPress and reduces post-migration cleanup.
Organize and optimize your media in the following ways:
- Images: Compress and resize for performance, ensure correct aspect ratios and alt text are retained
- Videos: Confirm supported formats and consider hosting large files externally (e.g., YouTube, Vimeo) if needed
- Documents: Standardize naming conventions and organize into clearly labeled folders or collections
Once optimized, upload assets into the WordPress Media Library and ensure metadata, such as alt text, captions, and descriptions, is preserved or enhanced. This not only improves SEO but also supports accessibility standards.
SEO considerations
Preserving your SEO equity during migration is non-negotiable. A thoughtful pre-migration SEO strategy helps retain rankings, avoid crawl issues, and ensure a smooth transition for search engines and users alike.
Set up URL redirects
One of the most important steps is mapping old URLs to new ones. Create a URL mapping sheet that aligns each Umbraco URL with its WordPress counterpart. This document will guide your redirect strategy.
- Use 301 redirects to preserve link equity
- Implement redirects using a plugin like Redirection
- Alternatively, configure redirects at the server level (e.g., via
.htaccessor NGINX) for performance and control
Transfer metadata
Umbraco stores important on-page SEO data like meta titles, descriptions, and alt tags that should move with your content.
- Extract metadata using tools like uSync or SQL exports
- Import into WordPress using SEO plugins such as Yoast SEO or Rank Math
- Ensure all metadata fields (titles, descriptions, image alt text) are mapped and retained correctly
Preserve canonical tags
If your Umbraco site uses canonical URLs to manage duplicate content, make sure they’re preserved in the WordPress setup.
- Add canonical fields to your SEO plugin configuration
- Review URLs manually where necessary to ensure they point to the right destination
- Avoid auto-generating canonical tags unless they match your URL strategy
Choose an SEO plugin
Select a reliable SEO plugin to centralize SEO configuration and management. Look for features like:
- Metadata editing (titles, descriptions, canonical tags)
- XML sitemap generation
- Schema markup support
- Integration with Google Search Console
Recommended tools include Yoast SEO and Rank Math, both enterprise-ready and widely supported.
Reconnect analytics and monitoring tools
After migration, re-enable performance tracking and crawling diagnostics.
- Set up Google Analytics on the new WordPress site
- Register your new sitemap and site URLs in Google Search Console
- Use crawl stats and error reports to quickly identify issues like missing redirects or 404s
Final note
Pre-migration SEO planning is what ensures your WordPress site launches without sacrificing visibility. When done right, it prevents ranking drops, maintains traffic, and gives your new platform a strong foundation from day one.
In the next section, we’ll walk through the actual migration process, covering tools, workflows, and quality checks.

