


How to migrate your existing media to DAM without breaking the site?
Migrating your media to a Digital Asset Management (DAM) system is a smart move for performance, scalability, and long-term maintainability. But if done carelessly, it can disrupt your WordPress site, create broken links, and hurt SEO. This guide walks your engineering team through a reliable migration process, covering technical pitfalls, smart practices, and ways to maintain performance and stability post-migration.
Step 1: Audit your media footprint
Before diving into the actual migration, conducting a website media audit is crucial. This step helps you uncover existing issues and shape a clear, structured DAM migration planning approach. You’ll also need to decide between a full or partial content migration strategy.
Tip: A full media migration to DAM is usually the best choice. Partial migrations add long-term complexity by requiring you to manage assets across two systems. They may work as a short-term solution, but consolidating all assets under one DAM is strongly recommended.
Another important step here is identifying orphaned or unused media files using WP-CLI or cleanup plugins like Media Cleaner, WP-Optimize, or Asset CleanUp. Removing these can significantly reduce your DAM implementation costs and simplify the overall website media migration to DAM.
Ultimately, this audit gives complete clarity on how and where your media assets are used, posts, pages, templates, shortcodes, or custom fields, setting the stage for a seamless WordPress DAM integration.
Step 2: Select a DAM that matches your workflows
After your audit, you’ll have a strong understanding of what your DAM implementation requires. Here are some essential features to evaluate for a successful implementation with custom DAM integration:
CDN integration
As you might know, CDN offloads the static asset requests from your web server and serves those requests from a region that is closest to the visitor. The DAM should offer a built-in CDN to cache and deliver assets quickly across regions, improving performance and user experience.
Filename and metadata retention
Ensure the DAM retains original filenames and key metadata, which are critical for SEO and media filtering.
Bulk upload & migration tools
Look for DAMs that support bulk media migration from WordPress, either through a plugin, dashboard, or API.
Media syncing options
Depending on your use case, the DAM should support one-way syncing (WordPress to DAM) or bi-directional sync.
DAM API integration
If you have custom workflows or multi-site needs, robust API access allows you to automate media operations and integrations.
Note: Not all DAMs support full automation or advanced WordPress DAM plugins out of the box, so ensure their WordPress integration matches your scale and editorial process.
Step 3: Transfer media in bulk
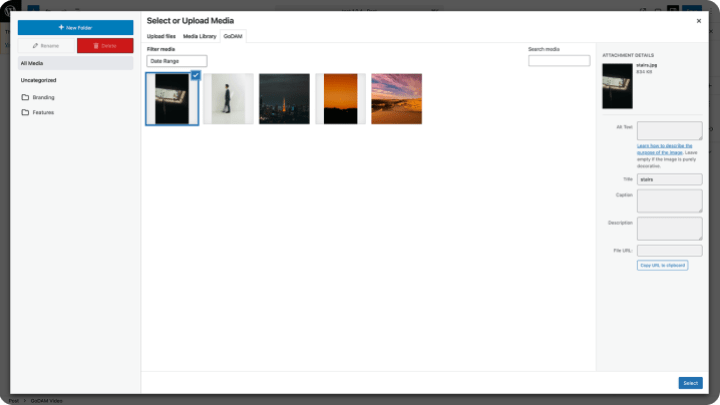
Once you’ve finalised your DAM provider, you’re ready to begin the actual DAM migration. To migrate media to Digital Asset Management, most platforms offer an upload media endpoint. Some also provide a bulk upload tool via their dashboard or plugin.
Using the upload media endpoint is the recommended approach as it offers some key benefits:
- You can verify whether all media files were successfully uploaded using the API response.
- You can create a reliable mapping of old WordPress URLs to new DAM URLs, which will be crucial for the next step, updating references across your site.
Note – This mapping step is critical. Without it, you risk broken links or missing media when replacing old URLs.
This mapping is crucial to prevent broken links post-upload and to ensure all WordPress DAM integration tasks are accurately executed.
Step 4: Update WordPress references
Once bulk media upload is done, the next critical step is to replace the existing WordPress media URLs with the new CDN URLs provided by your DAM. This is a potentially breaking change and should always be tested in a staging environment first.
This ensures a smooth rollback in case anything goes wrong. After thorough validation, you can apply the changes to the production site, but only after taking a full backup to prevent any data loss or downtime.
The approach to updating media references depends on whether your DAM retains the original filenames and folder structure or provides a predictable URL pattern. If so, a straightforward search-and-replace operation using WP-CLI can be used to update all URLs across posts, pages, and custom content types.
However, if the DAM generates new or non-derivable URLs, you’ll need to use a mapping file created during the media upload step. This mapping allows you to replace the old WordPress media URLs with the corresponding DAM URLs throughout your content, either manually or via script.
Special attention is needed for media using WordPress-generated thumbnails. If your content includes resized images (e.g., image-1500×1000.jpg), you’ll need to convert these references to a format supported by your DAM, for instance, https://cdn.dam.com/image.jpg?w=1500&h=1000, assuming the DAM supports dynamic resizing via query parameters.
After completing the replacement process, perform a full site audit to ensure all assets are loading correctly. You can use plugins like Broken Link Checker or external tools such as Screaming Frog SEO Spider and Ahrefs Site Audit to scan for broken links or missing images. While adding redirects using template_redirect or server-level rules (e.g., NGINX) may be a short-term fix, it’s better to replace broken links directly to reduce long-term maintenance overhead and avoid confusion within your team.
Step 5: Configure WordPress to use your DAM by default
To complete your WordPress DAM integration, the next step is to ensure that all future media uploads and references use your DAM by default.
If your DAM provides a WordPress DAM plugin, install and activate it for seamless integration. This plugin may offer features such as automatic upload to the DAM, media replacement in the editor, or embedding assets via blocks.
Ideally, new media should be uploaded directly to the DAM instead of the native WordPress Media Library, with syncing enabled to reflect changes on your site. This prevents media fragmentation and ensures consistent use of the DAM’s CDN for performance and asset management benefits.
If direct upload to the DAM is not feasible, the DAM should offer a synchronization mechanism that automatically pulls media from the WordPress library. In such cases, a scheduled job or maintenance task should periodically remove the local media files to prevent duplication and reduce storage use.
For inserting assets into posts or pages, use the DAM-provided URLs, either manually or via custom blocks, shortcodes, or embed logic that fetches and displays media from the DAM. This ensures that all content benefits from the performance, scalability, and management features offered by your DAM platform.
Step 6: Test everything thoroughly
After integration, perform a full site crawl to identify any broken media references or missing assets. Validate that CDN responses are fast and consistent across geographies. Pay particular attention to hotlinking issues or CORS (Cross-Origin Resource Sharing) errors, which can surface if the DAM’s CDN is not configured to allow access from your domain.
If any links are broken, confirm whether the asset exists on the DAM and replace URLs manually if needed. For minimal disruption, all testing should be completed in a staging environment before going live. This testing phase is critical to ensuring that media functionality remains intact, avoids SEO regressions, and upholds the performance standards required by your business.
Optimize for long-term performance
Once the WordPress DAM service is live, continue monitoring the site for 404 errors, speed regressions, and rendering issues. Ensure that lazy loading is consistently applied to all media assets to improve load performance. Confirm that the DAM is configured to serve modern image formats like WebP or AVIF based on the browser’s Accept headers, while providing appropriate fallbacks for older browsers.
For SEO and accessibility, verify that all media assets are served with correct alt text, title attributes, and cache-control headers. These optimizations ensure long-term performance gains and help maintain your search rankings post-migration.
Benefits you’ll notice after migration
Once your WordPress site is fully integrated with a DAM, you’ll start seeing long-term operational and performance benefits.
A DAM provides centralized media storage, meaning you no longer need to duplicate files across multiple websites or environments. This makes media management more organized and scalable, especially for teams working across brands or markets.
In addition, many DAM solutions offer advanced features like version control, publishing workflows, analytics, video transcoding, video editing, and user permission settings, making collaboration smoother and more structured.
If your Digital Asset Management migration is stable, you can safely remove media from the WordPress /wp-content/uploads directory to free up server space. One of the key Digital Asset Management benefits is automatic backup and archival, keeping assets safe and easy to recover.
Final thoughts
DAM integration is more than a technical shift, it’s a long-term investment in operational efficiency. By following a structured migration path, you prepare your web ecosystem for future growth without sacrificing performance or manageability.
If you are looking to unify media strategy across brands and regions? We’ve helped enterprises implement scalable DAM solutions with WordPress, and we can help you too.
Need expert guidance on WordPress DAM services or implementation support? Talk to us today and streamline your media operations for the future.
On this page


Leave a Reply