


How to optimize WooCommerce checkout flow for high conversions
When someone reaches the checkout page, they’ve already made up their mind, or at least partially. The product is good, the price is acceptable, and they’re almost there. But the last step? That WooCommerce checkout experience. If it feels slow, confusing, or messy, that’s all it takes to lose the sale.
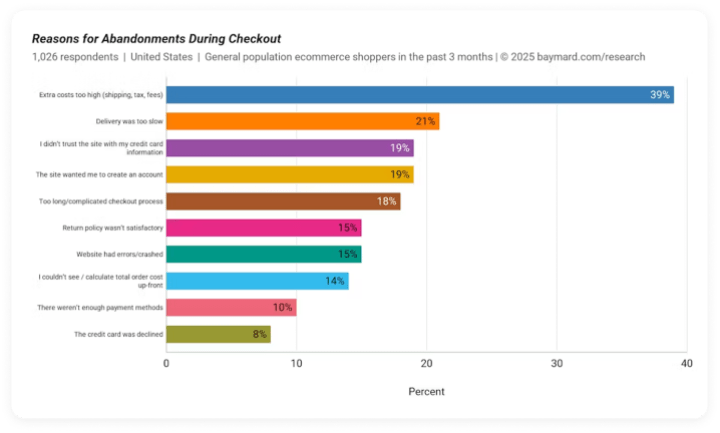
The Baymard Institute reports that the average cart abandonment rate is nearly 70 percent in 2025. And most of those drop-offs happen during checkout. So, for every 10 people who add something to their cart, only 3 complete the purchase.
So, how to reduce cart abandonment? Isn’t checkout just about asking for billing and payment details? What more can you do to optimize WooCommerce checkout? Let’s walk through a few practical steps to help you simplify and improve your WooCommerce checkout flow.
Best practices for WooCommerce checkout optimization
There is no one-size-fits-all formula for WooCommerce checkout flow, but there are proven strategies that work across many stores. It’s for you to analyze what works for you. Some changes are simple, but others might need a bit of development work. But all of them are aimed at one goal: making it easier for your customers to hit that final ‘Place Order’ button without second thoughts.
Here is where and how to start:
Streamline the WooCommerce checkout process
One of the most effective ways to boost conversions is by making your checkout process as fast and frictionless as possible. A streamlined checkout removes unnecessary steps and distractions, helping customers complete their purchases with minimal hassle. Here are a few key strategies to simplify the experience:
Single-page vs. Multi-step checkout
While multi-step checkouts break down the process into manageable steps, they can also feel like a long road to the finish line. A WooCommerce single-page checkout, on the other hand, consolidates all the information into one view, reducing the number of clicks needed to complete the transaction. However, for some, breaking it down into smaller, digestible steps can make the process less overwhelming. It’s essential to find the right balance between simplicity and clarity, depending on your customer’s preference and the complexity of the items being purchased.
Reduce form fields
Every field you ask customers to fill out is an opportunity for them to abandon their cart. Keep form fields to a minimum, asking only for the most essential information. Too many fields can overwhelm the shopper and create doubts. If additional details from customers are helpful for your business, consider making the fields optional so that it doesn’t affect the process.
Guest checkout
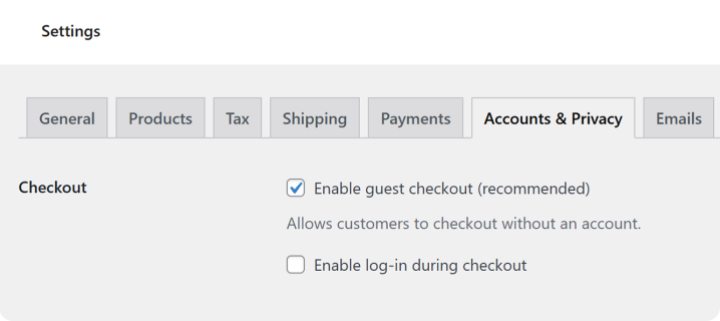
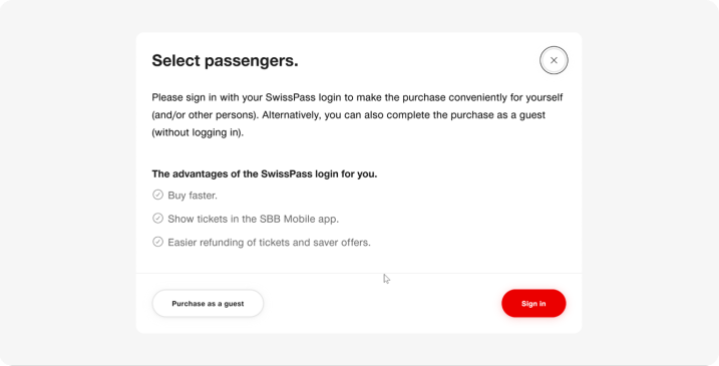
Not everyone wants to create an account when making a purchase. Offering a guest checkout option eliminates the need for customers to create a profile, saving time and reducing friction. Forcing users to register can lead to cart abandonment, so providing a quick and easy guest checkout option can increase conversions significantly. WooCommerce lets you turn on guest checkout easily from the settings. Just head to WooCommerce > Settings > Accounts & Privacy and check the box that allows customers to place orders without an account.
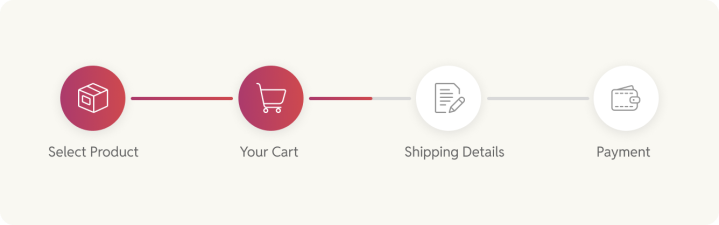
Add progress indicators for a better WooCommerce checkout experience
Showing customers where they are in the checkout process and how much is left to complete can reduce uncertainty and anxiety. A simple progress bar or step indicators give them a visual cue, which can help prevent them from abandoning the cart halfway through.
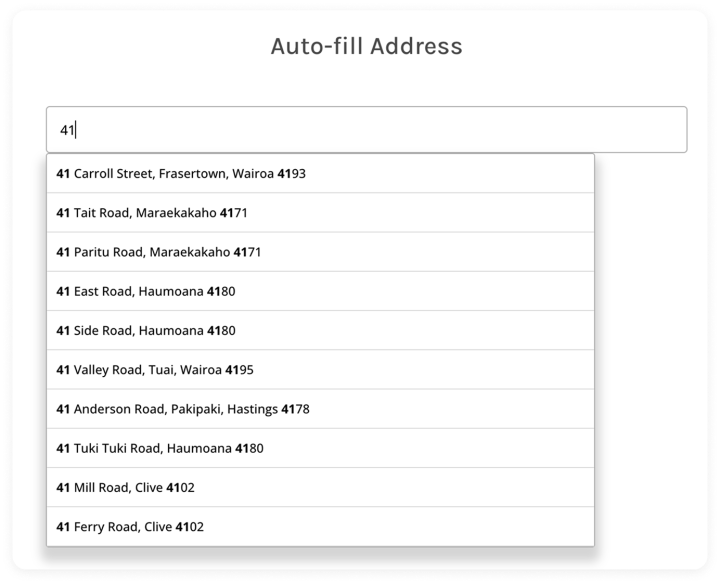
Auto-fill and address lookup
Making it easy for customers to fill in their shipping and billing details is crucial. Implementing auto-fill options can save them a lot of time, especially for repeat customers. Address lookup tools help avoid errors and prevent time-consuming searches for correct address formatting, improving overall accuracy and user experience.
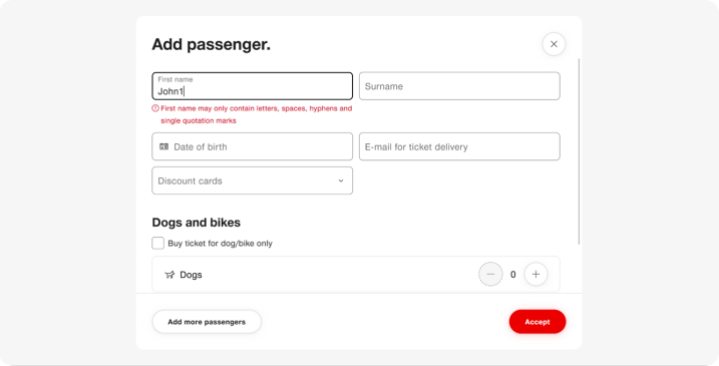
Real-time error validation
No one likes finding mistakes after they’ve already submitted their information. Real-time error validation helps by alerting customers to issues as they type, giving them immediate feedback. Whether it’s an invalid email format or missing address details, real-time error checking reduces frustration and prevents form abandonment.
While WooCommerce offers basic validation on form submission, you can take it a step further using tools like the Checkout Field Editor plugin, which lets you enhance form behavior and guide users in real-time.
Clear CTAs
Clear, action-oriented buttons are a must at every stage of the checkout process. Use language that is specific and indicates what the customer is about to do, such as ‘Complete Order’ or ‘Proceed to Payment’. This clarity helps guide the user and eliminates confusion, making it clear that they’re on the right track.
Speed and performance optimization
Even if your checkout flow is well-designed, a slow-loading page can kill the experience. Make sure your checkout loads fast on all devices to avoid drop-offs. Users might not wait around for a spinning loader when they’re ready to buy. Here are a few simple ways to keep things running smoothly and fast:
Minimize plugins and scripts
Too many plugins or heavy scripts can drag your site down. Stick to only what’s necessary. Audit your site regularly and remove anything that isn’t essential, especially on checkout pages.
Caching and CDN
Use caching to speed up repeat visits and a CDN to deliver content faster across different locations. These help reduce page load times, especially during peak traffic, such as your annual sale period.
Server optimization
Your hosting setup plays a huge role. If you’re expecting traffic spikes or running a high-volume store, consider moving beyond basic shared hosting. A managed platform like WordPress VIP offers enterprise-level performance, security, and scaling… perfect for big WooCommerce stores that can’t afford to slow down.
Payment and shipping optimization during checkout
You’ve got the customer at the finish line, so don’t lose them over limited payment options or confusing shipping details.
Multiple payment options
Customers expect flexibility when it comes to payment. Some prefer cards, others go with wallets or bank transfers. With WooCommerce, you can use WooPayments, a native solution that supports major credit/debit cards, Apple Pay, Google Pay, and even local payment methods depending on the user’s region. It’s built to work smoothly with your store and doesn’t require a third-party setup. While WooPayments has no subscription fee, it uses a pay-as-you-go pricing model. To set it up, go to WooCommerce > Settings > Payments in your WordPress dashboard, If WooPayments isn’t installed, you’ll see an Install button. Click it to install and then follow the setup wizard to connect your account and configure payment settings.
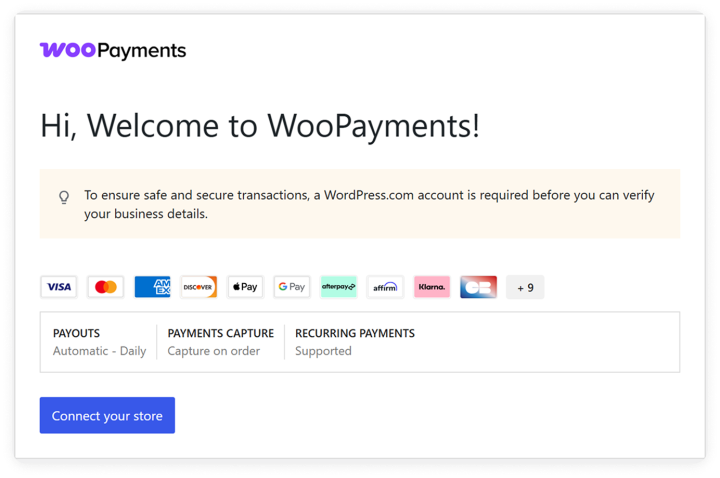
You can also enable other payment methods like PayPal, Stripe, or Cash on Delivery, depending on your audience’s preferences. The easier it is to pay, the more likely the sale goes through.
Trusted gateways
Use reliable and secure payment gateways. If a customer doesn’t trust the payment flow, they won’t continue. Stick to well-known providers that are easy to integrate with WooCommerce.
Transparent pricing and shipping
Clear pricing builds trust. Make sure customers know exactly what they’ll pay. No hidden fees or no last-minute surprises would mean fewer chances of abandonment. Be clear and upfront about shipping costs, delivery timelines, and tax. In WooCommerce, you can choose to show prices with or without tax using the Tax settings under WooCommerce > Settings > Tax. Make sure to add a suffix like excl. tax, especially if you’re displaying prices without tax. This helps avoid confusion when buyers reach the checkout.

Ensure WooCommerce mobile optimization
More people are shopping from their phones nowadays, so it is essential for your store and especially the checkout steps to perform smoothly on small devices.
Responsive design
Your checkout should respond perfectly on all screen resolutions. Every field should be easy to fill in, every button should be easily clickable, and all the information should be easy to find and read.

Simplified navigation
For an e-commerce store, it is normal to have many menu items in the header or multiple quick links in the footer, but they might serve as exit points for users. It is important to keep users focused on checkout for their purchase by minimizing distractions. The fewer the distractions, the better.
Mobile-friendly payment options
Users love it when they’re able to purchase the product in a few clicks, and only credit/debit card payment options can increase the session time. Add support for quick and mobile-friendly payment options such as Apple Pay, Google Pay, UPI, or Wallets. These are not only fast and secure, but also cut down the need to enter long details like credit card information, OTP, etc.
Exit-intent strategies to reduce cart abandonment
People often exit at the very last moment. Maybe because they changed their mind or found a better product or deal elsewhere. And let’s be honest, no matter how well-organized your checkout flow is, you cannot restrict users from leaving. But the good part? You can always pull them back in.
Exit-intent popups
If a user has made up their mind that they do not want to complete the purchase for any reason, an exit intent popup is your last chance to change their mind. It could be a small discount, free shipping, a limited offer, a free gift, or sometimes just a note on why they should not leave. While exit-intent popups can be super helpful, they can be annoying too at the same time so try not to be pushy.

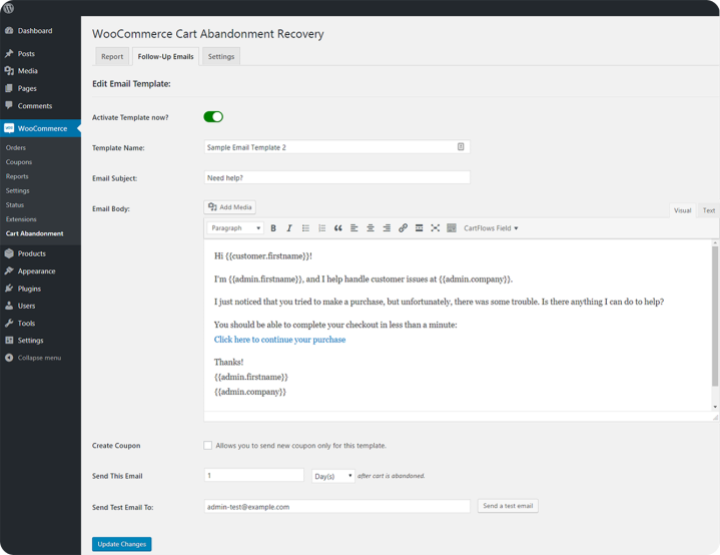
Abandoned cart emails
If the user left without completing their purchase, you can still bring them back with a simple email reminding them of what they left behind. Including product details helps avoid confusion, and just like exit-intent popups, offering a tempting deal in the email can make all the difference.
You can automate this with the WooCommerce Cart Abandonment Recovery plugin, which sends personalized recovery emails and helps you recover lost sales. With this plugin, you can send unique checkout links that take shoppers back to a pre-filled checkout page and also decide the sequence of the follow-up emails.
Persistent cart
WooCommerce automatically stores cart data in a browser cookie, so users don’t have to start from scratch if they return later. It remembers what they added to the cart, any coupons they applied, and even their shipping and tax details, making it easier to jump right back in and complete the purchase.
Advanced WooCommerce checkout customizations
Once the basics are in place, it’s time to level up the process. These might not be must-haves for any store, but if you’re scaling or running a high-level store, they can add value.
Custom fields and conditional logic
Custom fields are the best way to request additional information from customers, but make sure you only ask what’s important and do not overwhelm users with so many fields. Add conditional logic if you want to take certain steps based on certain conditions. For example, only show name fields if they select guest checkout. This not only keeps the form minimal but also relevant for all users.
While this isn’t built into WooCommerce by default but if you’re already using the Checkout Field Editor plugin for improved validation as suggested above, you’ll also appreciate its ability to add custom fields and conditional logic. The free version lets you add up to 20 different field types, and the pro version gives you access to conditional logic. It’s a smart way to keep your checkout form clean, personalized, and easy to complete.

Dynamic pricing and discounts
One of the best marketing strategies is personalized marketing. Imagine a targeted offer that exists only for you and for the product that you are interested in. You can add dynamic pricing based on the geolocation of the users, their product choice, the time they’re shopping, or even target personalized emails if they didn’t complete the checkout.
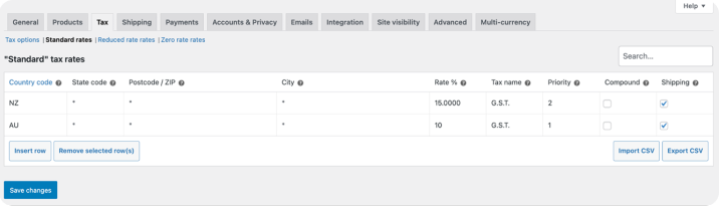
You can use WooCommerce’s Tax and Shipping settings to update fees based on the user’s location. To add tax rates based on Country, City, or Zip Code, go to WooCommerce > Settings > Tax > Tax Rates and click on Insert Row.
For shipping rates, you can set them based on Continent, Country, or Region by navigating to WooCommerce > Settings > Shipping and clicking on Add Zone.

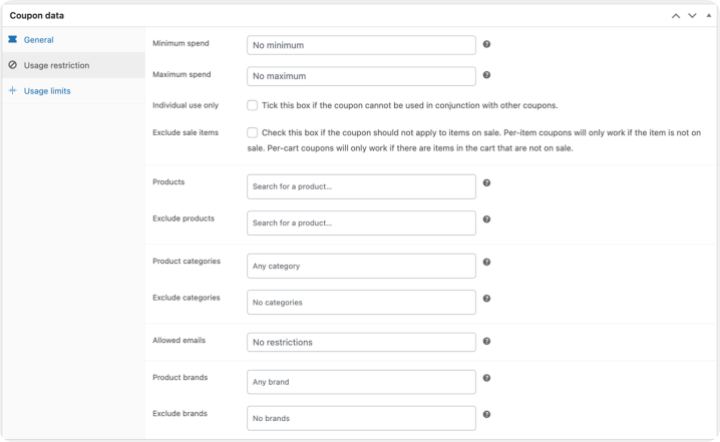
You can also leverage native coupon settings under Marketing > Coupons to offer discounts on specific products or target selected users.
Automate your WooCommerce checkout flow with third-party integrations
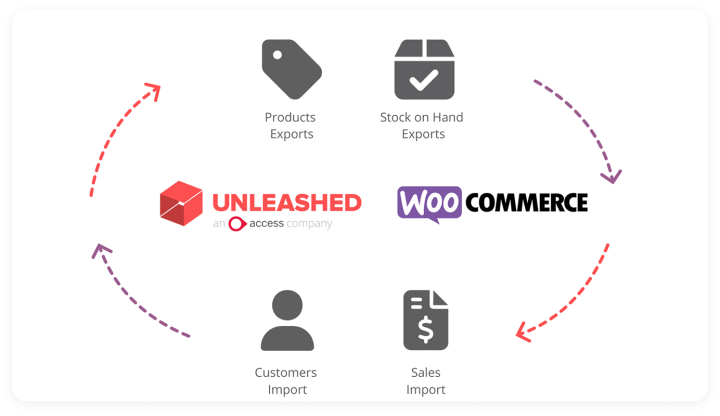
If your store is part of an ecosystem where each step is managed separately, such as supply chain, inventory, sales, purchase, etc., then consider syncing your WooCommerce store with third-party tools like Salesforce, Unleashed, Odoo, or HubSpot. Data should be communicated smoothly between all the platforms without manual effort.
Take Unleashed for example. It’s a well-known inventory management tool that integrates with WooCommerce to keep your stock levels accurate in real time. So when a product sells, your inventory is instantly updated across the board, with no manual work or data entry required.
Measuring and improving WooCommerce checkout performance
It might be difficult to fix if you’re not sure what the problem is, right? Therefore, tracking user activity is essential to continuously improve your store. Once the checkout process is set up, keep an eye on what people are doing on your website, how they’re interacting with it, what the hot zone is, and when they drop off.
Analytics and heatmaps
There are many tools that can help track user activities on your website if set up properly. Some of the most popular ones are Google Analytics, Hotjar, and Chartbeat. Sometimes it could be a minor bug or a broken link that forces users to drop, and most of the time it’s not what you expect, so having an analytics tool set up can be helpful.

A/B testing
One process might not work for all. For a fashion store, UI and minimal fields matter, while for a pharmacy, a clean and detailed form would be preferred. Test what works for you. Test different versions of your checkout flow and keep what promises better results. Try changing CTA text or placement, rearranging fields, adding or removing additional steps, etc. Tools like VWO or AB Tasty can make the testing process easier.
Continuous testing and optimization
If it’s the first time you’re setting up the store, it won’t be perfect. Even if you follow all the best practices, a need for continuous improvement will always exist, and things will start taking shape when they’re data-driven. Always keep an eye on users’ data, patterns, and reports. Take user feedback seriously and, if possible, interact with them to keep improving. Checkout is the most important step of your website, and it is definitely not a one-time task.
Conclusion
The WooCommerce checkout process is where all your hard work either pays off or gets abandoned. You have completed the first challenge to get users to the checkout page, but that’s only half of it. The final challenge is to convert users into customers. Don’t let a buggy page, slow pagespeed, clunky design, or any silly bug affect your sales.
Focus on clarity. Keep your website fast, simple, and user-friendly. Optimizing your WooCommerce checkout isn’t about improving your website design or form, it’s mainly about removing blockers, building trust, and making the final step feel easy.
Start with the basics, keep improving, and you will see the difference where it matters the most.
At rtCamp, we’ve helped enterprises optimize WooCommerce checkout experiences, from reducing cart abandonment to implementing scalable customizations.
Whether you’re unsure how to set up WooCommerce checkout flow or looking for WooCommerce checkout flow best practices, we can help.
Get in touch to explore how we can help optimize your WooCommerce checkout for higher conversions and long-term scalability.
On this page


Leave a Reply