W3 Total Cache is my favorite plugin when it comes to configuring CDN with WordPress. I already posted how to configure MaxCDN with W3 Total Cache almost 2-years back.
Today I will show you how to configure Amazon Cloudfront CDN using W3 Total Cache as a “generic” origin-pull mirror.
This is 2-step process:
- Creating Amazon Cloudfront Distribution to be used as CDN for WordPress
- Configuring W3 Total Cache to use Amazon Cloudfront Distribution
In between above 2-steps, you can add an extra step to create “white-labelled” CNAME records in case you like to use something like cdn.example.com instead a random subdomain from cloudfront like d3otazh35pn6.cloudfront.net
Creating Amazon Cloudfront Distribution to be used as CDN for WordPress
Login to your amazon aws console: https://console.aws.amazon.com/cloudfront/home and click on “Create Distribution” button.

It will start a 2-step process. In Step-1, use delivery method “Download” which is set by default and click “Continue”.

In Step-2, You will be asked different settings for this new Cloudfront distribution.
Under “Origin Settings”, set…
- Origin Domain Name: example.com
- Origin ID: example.com
Under “Distribution Settings”…
You can add your one or more CNAMEs to Alternate Domain Names(CNAMEs) setting.
This is optional but if you choose to use custom CNAME record(s), do not forget to configure them on your domain registrar’s end. Instructions for CNAME records are NOT covered in this article.
CloudFront Distribution List
Once you complete setup, this newly created distribution will appear in CloudFront Distribution list.
You can see Domain Name value here only which we will need to provide to W3 Total Cache going ahead. This is the value you will also need in case you want to setup your own CNAME records.

You can see more details and complete domain name value by clicking on info icon.

Configuring W3 Total Cache to use Amazon Cloudfront Distribution
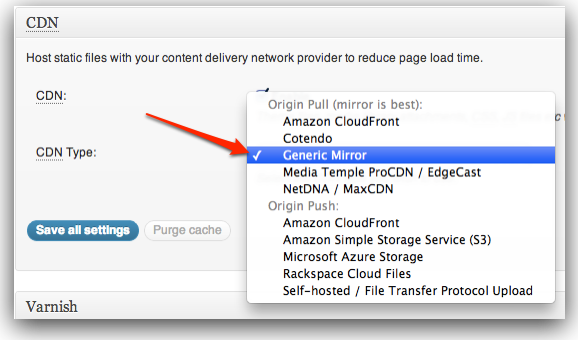
W3 Total Cache provides many options to configure a CDN for your website. For Amazon Cloudfront also, they provide 2 different ways. But we will use “Generic Mirror” option as we have configured CloudFront manually in above steps. You are free to configure Amazon using other ways as well.
Go to W3 Total Cache’s General Settings. Scroll down to CDN section (not submenu)

Select “Generic Mirror” option and click “Save all settings” button.
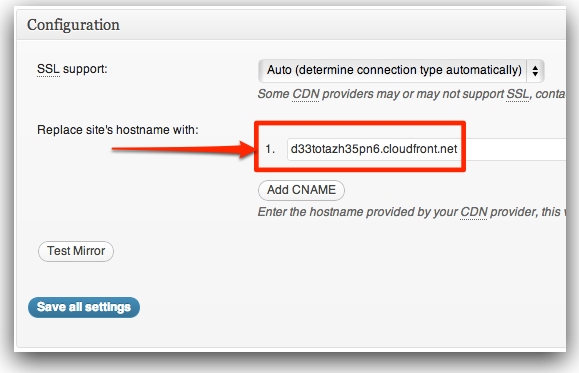
Then go to W3 Total Cache’s CDN Submenu. Scroll down to Configuration section.
In “Replace site’s hostname with:” field, paste value of your CloudFront Distribution Domain Name. You can also paste value of CNAME if you have configured one already.

Next, click “Test Mirror” button. If you get positive response, click “Save all settings” button to save changes.
Finally, clear your page cache. W3 Total Cache will remind you about this. But this time you shouldn’t ignore it!
If you stuck/need help, feel free to use comment form below! 😉
Update:
Many users asked why we are using Generic Mirror when Amazon CloudFront option is already in dropdown menu.
On many occasions, Amazon CloudFront option did not work for us. Though, it that option works for you. Please use it. Most likely, using Amazon CloudFront way will purge your CDN cache automatically from WordPress dashboard. BUT, Amazon CloudFront charges for cache-purge also. So accidental and unnecessary purges will increase you bill.
This billing aspect is another reason, we did not think bother to try harder to get Amazon CloudFront option working for us.
Related: Using MaxCDN with W3 Total Cache