
If mails from your web-server/webapp is having delivery issues, DKIM (DomainKeys Identified Mail) can help you big time.
Its highly recommended to use DKIM for outgoing emails even if your server is not running any kind of mail-hosting.
Install DKIM
apt-get install opendkim opendkim-tools
Edit Config files
DKIM config
Open dkim config file vim /etc/opendkim.conf
Add following lines towards end. Make sure you replace example.com with your domain/subdomain.
			Domain                  example.com
KeyFile                 /etc/postfix/dkim.key
Selector                mail
SOCKET                  inet:8891@localhost
Next open dkim defaults file vim /etc/default/opendkim
Change default socket path by adding a line like below:
SOCKET="inet:8891@localhost"
Postfix file
Open postfix main config file vim /etc/postfix/main.cf
Add following lines towards end.
			# DKIM
milter_default_action = accept
milter_protocol = 2
smtpd_milters = inet:localhost:8891
non_smtpd_milters = inet:localhost:8891
DKIM Key Generation
Run following commands with mail and example.com matching values used in /etc/opendkim.conf file in earlier step.
opendkim-genkey -t -s mail -d example.com
This command will generate mail.private and mail.txt file. mail.private is private key that will be used to sign outgoing emails. Move it to the location we specified earlier in /etc/opendkim.conf
cp mail.private /etc/postfix/dkim.key
DNS Record Setup
Next, you need to create a TXT record on DNS end. Just check content of mail.txt file created by opendkim-genkey command we ran above.
cat mail.txt
You will see something like below:
mail._domainkey IN TXT "v=DKIM1; k=rsa; t=y; p=MIGfMA0GCSqGSIb3DQEBAQUAA4GNADCBiQKBgQDYv84GSl0Xp2CrPdFqMZ9ShBDi9Pal9XpfIf7asEENxLRdIka3TONpqtrcCKksROJBNh2G3OVGuoGJ1watQGT46B+zQtjcCI67+WiTlb2D98s1UV3KO7oi/0QH/lH8DzUmrGJUIy3ZBQ9mIu1t6YDyi8y3hlhTILHW7G4HV/VtwQIDAQAB" ; ----- DKIM key mail for example.com
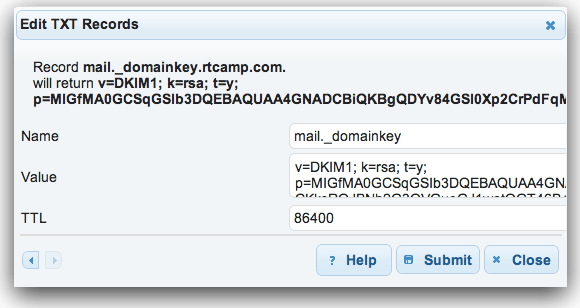
TXT record will require NAMS & VALUE.
Use mail._domainkey for NAME and long string in quotes starting from v=DKIM1 as VALUE.
Below is a sample screenshot for a TXT record. User-interface on your end might differ.
If you are editing a previous DNS record, it might take sometime for changes to propogate.
Start Signing
Once al config & setup done, you need to start DKIM service and restart postfix.
			service opendkim start
service postfix restart
Testing DKIM setup for correctness
Anything we do, specially for first time, must end with successful testing!
There are many tools for testing. I will mention few of them below.
Verify DNS Records for DKIM Setup
This will ONLY verify if your TXT record is created successfully.
dig command
Classic and easy. You must be having this already. Running…
dig <strong>mail</strong>._domainkey.<strong>example.com</strong> TXT
should return a response like…
			;; ANSWER SECTION:
mail._domainkey.exmaple.com. 86400 IN	TXT	"v=DKIM1\;" "k=rsa\;" "t=y\;" "p=MIGfMA0GCSqGSIb3DQEBAQUAA4GNADCBiQKBgQDYv84GSl0Xp2CrPdFqMZ9ShBDi9Pal9XpfIf7asEENxLRdIka3TONpqtrcCKksROJBNh2G3OVGuoGJ1watQGT46B+zQtjcCI67+WiTlb2D98s1UV3KO7oi/0QH/lH8DzUmrGJUIy3ZBQ9mIu1t6YDyi8y3hlhTILHW7G4HV/VtwQIDAQAB"
Web-based Record Check
You can use http://www.protodave.com/tools/dkim-key-checker/
Use selector mail and domain example.com there.
Verify DKIM Signing
Test #1 – Email-based
If you have setup keys correctly then you should pass this test.
You can test by simply sending an email to autorespond+dkim@dk.elandsys.com or check-auth2@verifier.port25.com
It’s better to use swaks tools for mail-testing (apt-get install swaks).
swaks -t check-auth2@verifier.port25.com -f me@example.com
Replace me@example.com with your mail id where you would like to receive test results.
Test #2 – Web-based
Better choice will be to use a service like http://www.mail-tester.com/ which gives you a temporary email ID and web-interface to see what happens to the email on receiving end!
For WordPress, its better to test using Check Email plugin as you will get better picture of what happens to mail sent from WordPress!