


We will use a machine where OpenSSL is already installed. This can be your one of EC2 instance or local machine.
Following is carried out on Ubuntu.
Install OpenSSL
Just run following command:
apt-get install openssl
OpenSSL Config File
Copy OpenSSL config file
Create a temporary folder:
cd ~ && mkdir elbssl && cd elbssl
Create a copy of OpenSSL config file in above dir
cp /etc/ssl/openssl.cnf elbssl.cnf
Editing Config File
Open elbssl.cnf and look for [ req ] section.
Find add uncomment following line:
req_extensions = v3_req
If you don’t find a line like above, you can add one.
This will make sure our next section [ v3_req ] is read/used.
In [ v3_req ] section, add following line:
subjectAltName = @alt_names
It will look like:
[ v3_req ]

# Extensions to add to a certificate request

basicConstraints = CA:FALSE
keyUsage = nonRepudiation, digitalSignature, keyEncipherment
subjectAltName = @alt_names
Finally add a new section called [ alt_names ] towards end of file listing all domain variation you are planning to use.
[ alt_names ]
DNS.1 = www.example.com
DNS.2 = example.com
Note: I couldn’t find out whether we need to add domain used in common-name field again here. So I added it again here. Now in common-field, we use www.example.com version – if SSL is for www and non-www versions of domains.
Now you have your OpenSSL config file ready.
OpenSSL Private Key & CSR
Private Key
Run following command to generate private key. Do not use passphrase as nginx will use this private key.
openssl genrsa -out example.com.key 2048
Certificate Signing Request – CSR generation
Next, we will generate CSR using private key above AND site-specific copy of OpenSSL config file.
openssl req -new -key example.com.key -out example.com.csr -config elbssl.cnf
Please note -config switch. If you forget it, your CSR won’t include (Subject) Alternative (domain) Names.
Verify CSR
Since sending CSR and getting certificate is time consuming process, it’s better to verify if CSR is generated correctly.
Run following command:
openssl req -in example.com.csr -noout -text
You will see something like below in output. Please make sure you read highlighted area.
Certificate Request:
    Data:
        Version: 0 (0x0)
        Subject: C=IN, ST=MH, L=PUNE, O=RTCAMP SOLUTIONS PRIVATE LIMITED., CN=www.example.com/emailAddress=admin@example.com
	[...]
            X509v3 Basic Constraints:
                CA:FALSE
            X509v3 Key Usage:
                Digital Signature, Non Repudiation, Key Encipherment
            X509v3 Subject Alternative Name:
                DNS:www.example.com, DNS:example.com
	[...]
Submitting CSR and Requesting certificate
Once you have CSR, the process of submitting it is online and often coupled with extra steps depending of certificate provider.
You can refer to GoDaddy workflow and Thawte Workflow here.
Also, when you get certificate from provider, you can verify if its correct by using this article.
Uploading Certificate to Amazon ELB
You may need to convert Private Key, Certificate and bundle/intermediate-certificate in PEM format before uploading them to Amazon ELB.
Please refer to “Upload the Signed Certificate” section in – http://docs.aws.amazon.com/ElasticLoadBalancing/latest/DeveloperGuide/ssl-server-cert.html
Uploading Interface
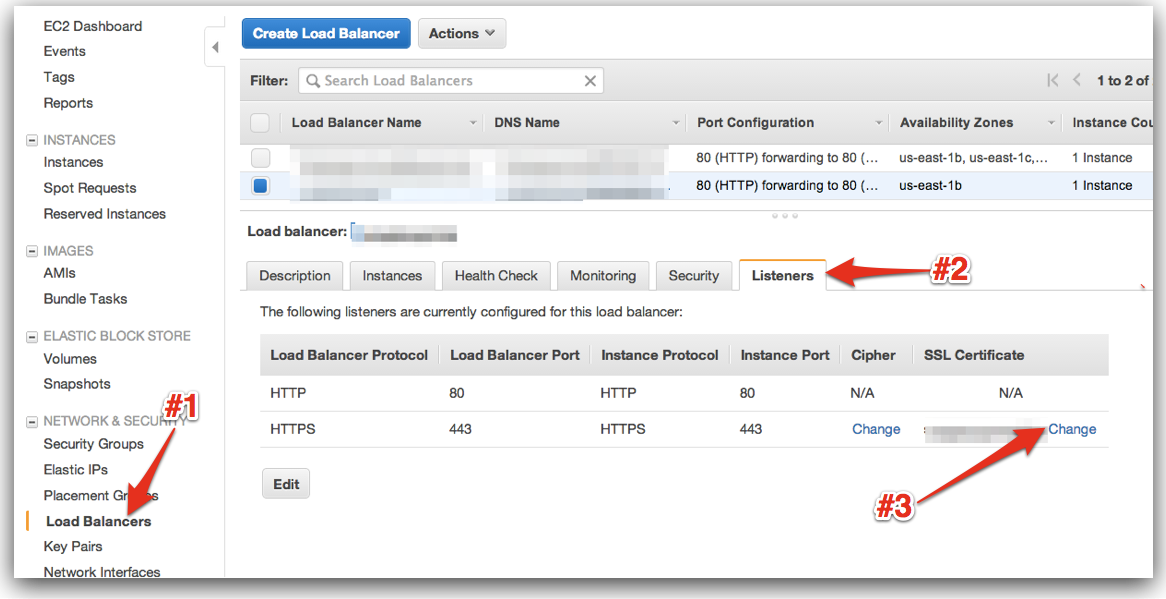
Check Listener Tab on load-balancer page. Click upload/change and you will see a box like below:
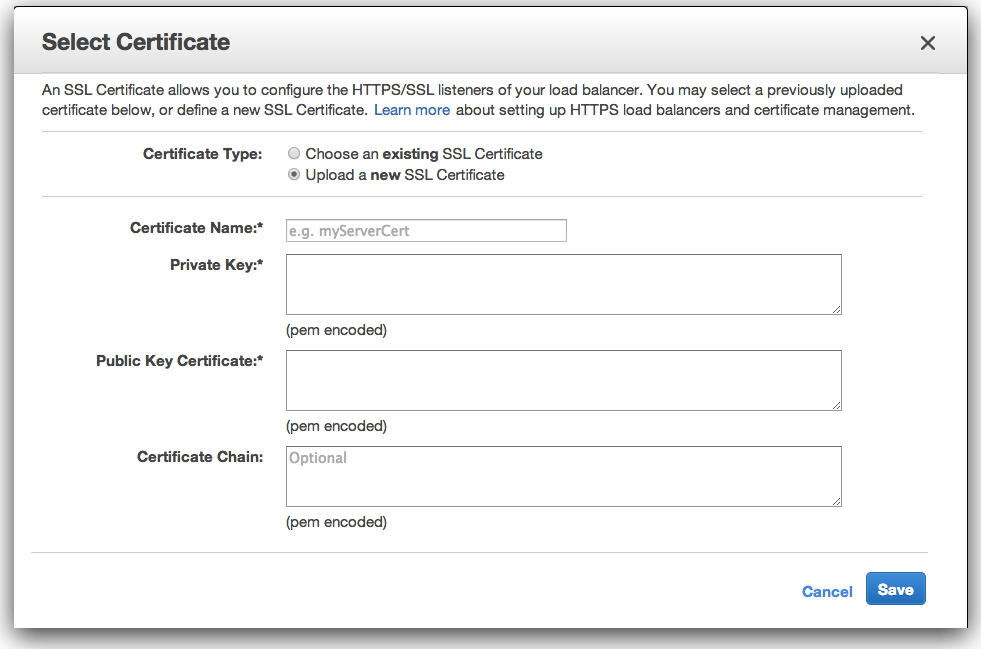
As you can see, there are 3 fields to paste Private Key, Public Certificate and intermediate bundle.
Make sure you verify SSL certificate for all domains after saving. May be using – https://www.ssllabs.com/ssltest/